Pages

Friday, August 19, 2011

3pepper bacon caper’d fettuccine carbonara


challenged. that is me. especially true while making a recipe on the spot, with what i have, when hungry, and my digital clocks have moved from evening to night. you know the story, late work day goes later, you go to the gym, forget about any Friday plans you had.. and go home to make dinner.

this one turns a winner, trust me.

resolution? well, thanks to the nature of yeast, we're enemies, pizza was out of the question. plan B?

carbonara. healthy. colorful. carolie-ful. carbonara.

an improvement on my last effort, but still better if i were capable of adding that Italia accent, Mmm!

sports update, this is on my mind. basically, the Cards lost to the Cubs today. bring on the sadness. Djokovic couldn't find the court. sad still, but lesser.

believe it or not, the above gets trumped by my redic' productivity in the lab, the gym and how i'm about to celebrate at a friend's annual bash on Saturday night. life is seriously bringing it right now.

i'm on an eat, sleep, repeat diet for the next weeks.. STL, KC, Labor Day weekend dove hunts, KY Lake. to my dear friends in Springfield, i'll be there soon.

happy reading, fair writing.. in true life. salute!

the printer friendlier version

3pepper bacon caper’d fettuccine carbonaraserves one, 20 min

3 slices fresh bacon, semi-to-thick
1 large clove garlic, chopped
3 small peppers, mix of colors (red, orange and yellow is nice)
1 tbsp fresh cut parsley
1 large teaspoon capers
single serving fettuccine
1 fresh farm egg
1/2 c. spinach
2 tbsp fresh parmesan, grated
salt and pepper, to taste

preheat medium saucepan over medium high heat. cut sliced bacon into smaller pieces (your preference to stir into pasta later), then add to skillet. chop garlic, dice peppers and cut up spinach while bacon is cooking. you may also add the egg, s&p, and 1 ½ tbsp parmesan to small bowl and scramble - set aside.

bring small pot of salt water to a boil. add pasta and cook a la dente.

cook bacon until done, but not crispy. remove, saving drippings. add garlic and peppers, cook 2 minutes. toss in the capers and stir for another minute - longer is okay.

remove pasta, strain and return to pot with small amount of olive oil (or butter) - to prevent sticking. make sure pot is removed from heat, add egg mixture, spinach, bacon, and stir quickly being careful not to scramble the egg.

plate, top with 3pepper mixture, grade fresh parmesan on top with s&p and enjoy!

Wednesday, August 3, 2011

pecan’d zucchini cranberry bread

[no pic. who knew this would be a fan fav?..]

a few things are happening right now. i am blogging per request. success!

without half as much has been my recent attempt(s) to overcome my greatest kitchen challenge. baking. yes, yeast hates me.. or we’re allergic or something. i’ll just say it has a problem with getting its weight up.

so here’s the story.. my friend Ellie is busy farming up in the northeast, leaving me with a surplus of jealousy. au contraire my oven produces these tasty goods while Ms. Ellie faces a surplus of zucchini.. you see the match?

well luckily for all of us, this zucchini ‘bread’ ain’t actually bread. ya, yeast sits the bench for this one and my DH, “MAD” Baking Skills, homer’d this beautiful 9x5 loaf of delicious, moist... mmm. mm.

as i was saying, saying we all have a little zucchini to spare is an understatement. so if you are so enthused, get shredding!

the printer friendlier version

pecan’d zucchini cranberry bread 
adapted from allrecipes.com
makes one 9X5 loaf, 1 hr 20 min

1 1/2 c. all-purpose, unbleached flour
1 c. granulated sugar
1 1/2 tsp ground cinnamon
3/4 tsp salt
1/2 tsp baking soda
1/4 tsp baking powder
1/4 tsp ground nutmeg
1 farm fresh egg
1 c. zucchini, shredded
1/2 c. vegetable oil
1/2 tbsp vanilla extract
1/2 c. cranberries, fresh or frozen
1/3 c. pecan, chopped

preheat oven to 350.

in a large bowl, toss together ingredients flour-to-nutmeg. in a medium bowl, mix together zucchini with egg; adding in vegetable oil and vanilla as you go. add wet to dry, folding in egg mixture to flour mixture until just blended. fold in berries and nuts next.

grease all sides of a 9x5 pan with a stick of butter. pour batter into greased pan and bake for 50-60 minutes. when the loaf passes toothpick test, take it out of the oven to cool on a wire rack if you have one.

*note: if you in the slightest way take a liking to raisins, or oatmeal raisin cookies, pack this thing with raisins instead of cranberries. either will please as much as the other.

Tuesday, June 28, 2011

not your momma's manicotti


so here's what you need to know, this ain't yo' momma's manicotti.

while i am on the subject, i will lay it out now.. ask yourself, are you someone that has a favorite excuse?  you know, one that trumps all else.  these change over time.. from "i did my homework, but the dog ate it :( " to "i am going to mow the lawn as soon as i finish my science project".. and so on.  the school theme was a popular one for me growing up.

reason for lack of blogging in the past month.  "grad school is a b3@$t."  (momma's don't be fooled.)

while piling up my summer brain with research tasks, things, and an occasional night out (congrats Mr. and Mrs. Aaron Huey!), i have learned that i have been learning something in the past five years of my college career.  what did i learn?  well.. stuff.

stuff #1.. baking is a science, and more frequent attempts lead to more fluffy sweets and less flat things in the oven.  stuff #2.. learning how to handle situations with a landlord that lead to (a) happy gardens, (b) a swim-able pool, and (c) HVAC systems that work when it's 90+ degrees.

so yea, i'm feeling better about this being in school thing.  who said having faith in intuition is such a bad habit?

speaking of habits, listening to music, there's one.  hello arcade fire!  i'm taking the blame for this one.  my friends are generally great, double-outstanding people, but.. this cat coulda come out of the bag a little sooner don't you think?!  whew.  let's just say that Sprawl II blew my mind.  and it's a good thing that it did because tonight, i slaved perfecting the marinara in this manicotti.

enjoy responsibly,

the printer friendlier version

not your momma's manicotti
adapted from Giada
serves two, 60 minutes

marinara sauce: (makes just over 2 cups)
60 minutes

2 tbsp olive oil
4 clove garlic, diced
8 medium tomatoes
2 tbsp parsley, chopped
2 tbsp basil, chopped
2 tbsp oregano, chopped
1 bay leaf

start by blanching tomatoes in boiling water for about one minute, remove and dip in ice batch immediately.  cut shallow cross on bottom of tomato will ease peeling.  peel and seed tomatoes, then diced petitely and add to medium sized wok with olive oil and garlic heated over medium heat.

add remaining fresh or dried ingredients on medium heat for 10 minutes, then reduce to simmer for 30-40 minutes time.  sauce only gets better with time.

manicotti:
55 minutes

2 tbsp olive oil
1 lb zucchini and portabellas, sliced only moderately thin
salt and fresh ground black pepper
6 manicotti, about 1/2 pack
1/2 (15-oz) container whole-milk ricotta (you can make your own :)
1 1/2 c. mozzarella, shredded
1/2 c. parmesan, grated
2 tbsp parsley, chopped
2 clove garlic, diced
1 tbsp butter, cut into small cubes

start by preparing a baking sheet for manicotti to cool on, using a tablespoon of olive oil to 'grease'.  cook manicotti with boiling salted water until slightly soft, but still firm to the bite - approx 5 minutes.  drain and transfer pasta to baking sheet to cool.

combine ricotta, 1/2 to 1 cup mozzarella cheese, 1/4 c. parmesan and parsley in medium bowl.  add one clove garlic, salt, and pepper to taste, then mix.

preheat oven to 350 degrees.

brush remaining olive oil on medium baking pan (i used about an 8"x8" pan).  spoon in 1/4 of total marinara sauce on bottom of the pan.  stuff cheese mixture into cooled/cooling pasta.  arrange pasta in pan in a single layer, pour remaining sauce over pasta and add butter randomly to pan.  cover with remaining mozzarella and parmesan, saving some for garnish if desired.  bake manicotti uncovered until sauce is bubbling, about 30-35 minutes.

while baking, saute portabellas and zucchini in olive oil, garlic, salt and pepper and herbs to taste.  this saute should be over medium heat to just cook vegetables through - test with a fork.

remove manicotti from oven, cool and serve split-style on plate and serve portabella mix in between.  garnish to desire, enjoy.

Friday, May 20, 2011

mushroom and radish saute (on the side)


if i were to pass you a side dish of radishes, let’s just say, you’re probably thinking you’re going to pass that thing so quick that no one will ever know you had the chance for a helping. my tip, don’t try fooling the cook.. they know.

the time has finally come and my CSA crop is in! and for 22 weeks, i’ll have a fresh delivery of produce and tasty farm raised everything. i’ve been waiting for this.

a mix of salad greens, basil the size of small trees, greenhouse tomatoes, a dozen eggs, and what else... oh yes, radishes. radishes.

i knew this moment was coming, thought about it most the day actually. so what did i do?
i sliced up a thin sliver of radish, nibbled it a bit and then tossed the rest down the hatch. it was officially the first time i’ve tasted a radish, ever.

follow me through this one, let’s get beyond these radish-phobia together. try this, radishes and butter. better? what about radishes, butter and honey.. huh huh? match it with quartered mushrooms with sweet basil and you’ll be on this side dish like a honey bee on a wildflower.

today was rain. under sunshine i may have tried this version.

the printer friendlier version

mushroom and radish saute (on the side)serves two, 15 minutes

2 c. button mushrooms, quartered
4 small radishes, sliced thin (keep radish greens too)
3 cloves garlic, diced
1 tsp red wine vinegar (or apple cider)
1 tbsp extra virgin olive oil
3 tbsp fresh basil, chopped into large pieces
1 tbsp butter, unsalted
2 tsp honey
salt, to taste
freshly ground black pepper, to taste

start by melting butter over medium heat in a medium size saucepan. add garlic, salt and pepper to taste and saute 1 minute. add mushrooms, basil, and a splash of water. remove radish greens, clean and chopped as finely as possible. add greens to mushroom saucepan, cover and cook unstirred for 10 minutes

heat oil over medium heat in small saucepan. add radishes, salt to taste and saute without stirring for 3 minutes. toss in vinegar, stir and cook for a few minutes more. reduce heat to low and add honey.

stir up mushroom mix and plate. place radishes on top, garnish with any extra basil you may have and serve. enjoy :)

Saturday, April 30, 2011

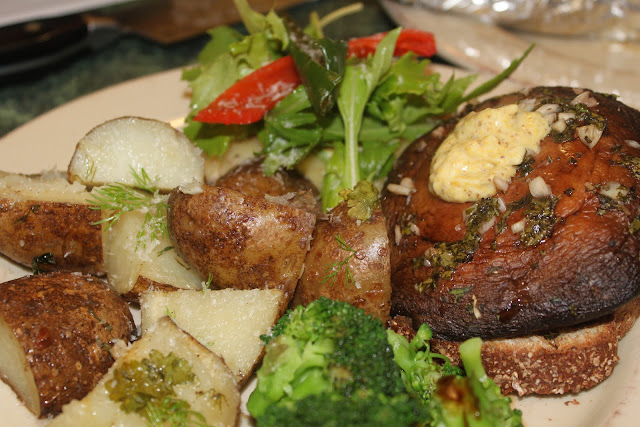
portabella perfect(ed)


this is safe to say... when today began, there was one thing that i had perfected in my life, it was called 'world's best meatloaf'.  (quotations are necessary to illustrate the title in case you ever come across it, not because it's make believe.)

my second perfection is this 'burger'... shall i share?

technically speaking, i should say near perfected - don't make the same mistake i did, grill two for you and whomever else wishes to indulge.. you'll want another one later. i can be trusted, just ask my mother.

not related to perfections, but i purchased my first carbon-free emissions road bike this week. next week, little red (my car) is getting a rest and i'm trading her weekday use for a 12 mile daily commute. plan is to use little red only for a rain shielding device during the rest of this torrential spring.. and for weekly grocery runs, etc. too. 'rain shielding device'? #dyee - d*mn you engineer English. funny i bring this #dyee thing up..

pay it forward: a great friend, you can call her Lindsey, shared her 3 am engineer jokes with me recently. appropriate for me, as engineer-in-training, and appropriate for you because it shares the #dyee perspective. please read, share and laugh.

ps - a short sweet talking might get you that meatloaf recipe.

the printer friendlier version

grilled portabella burger
adapted from allrecipes
serves two, 20 minutes

2 large portabellas, whole
2 tbsp red wine vinegar
2 tbsp organic olive oil
2 tbsp fresh oregano, chopped
2 tbsp dried basil
2 cloves garlic, diced
1 tsp salt, to taste
1 tsp freshly ground black pepper
2 slices baby swiss cheese
1 tbsp mayo
1 tbsp course mustard
2 sweet peppers, halved (one red, one green)
handful fresh arugula

start by firing up your favorite grill with your favorite natural hardwood charcoal, preheat to medium high. mix vinegar, olive oil, oregano, basil, garlic, salt and pepper in small bowl. set portabellas in shallow bowl and brush on marinade, saving some for re-marinating. allow to set at room temperature for 15 minutes, reapplying every 5 minutes.

'bellas will grill for a total of 15 minutes.  put them on the grill, grilling on 'medium-high' heat part of grill for first 5 minutes.  re-marinade at 5 minute mark and move 'bellas to 'medium' heat, grill there for 5 minutes more.  at the 10 minute mark there are two steps, (1) move 'bellas to 'medium-low', re-marinade and (2) apply sweet peppers to the grill.  remove 'bellas and peppers at 15 minute mark.

whisk together mayo and mustard, prepare your favorite whole wheat toast and melt swiss over one half. plate toast with greens and peppers atop cheesed half.  remove 'bellas from grill and place on second half of toast.  apply mayo mixture to bella.

notes:
top with greens that best suit you.. or your guests. i like arugula, i'm in a state of obsession and bought seed today.

Saturday, April 9, 2011

Mexican beef pot roast


to the queen of the slow roast cooker,

if i knew then, what i know now.. the crockpot wouldn't have been my life's first magic trick. its work continues to blow my mind.

cooks make the best friends, let's be serious.  it was in a friend relationship like this that an undercover "queen of the slow roast cooker" truly showed me that a crockpot is the coolest electric gadget in the kitchen... go away microwave!  (thanks Holly :)

i had no idea. no idea that dinner could be made while cooking up my regular scrambled eggs, bacon and toast for breakfast. no idea a quick slice of this and dice of that, plus water plus three slow cooking hours equaled the most beautiful, well-aroma'ed greeting i've ever met at the crack of a front door!

you get it right? with a brief morning effort, you can have a delicious dinner ready the instant you walk in the door after work/school/day tripping to your favorite national park... i don't know. it's a glorious invention.


i could go on,... consider yourselves lucky... here's what happens when the crockpot goes on.


spring is here or near - wooooh! - and while you may still have a few of those roots and tubers from your winter stash, take this as your last chance to make the perfect batch of slow cooking goodness. your mouth, nostrils and eyes will thank you instantly... well, after the 3+ hours of course :)


Mexican beef pot roastadapted from Harvest Eating, Keith Snow
serves three to four, 3 hours 30 minutes

3 lb beef chuck roast
4 cloves garlic
1 poblano pepper
1/4 c. vegetable oil
1/4 c. tomato sauce
4 c. beef broth
1 tbsp ground cumin
1/4 c. all-purpose flour, unbleached
1 tsp salt
1 tsp freshly ground black pepper
6 potatoes, mix of russet and red potatoes
3 carrots, medium size
4 whole mushrooms, sliced

start by preheating crock pot on high. heat oil in medium skillet on medium heat, saute garlic and pepper for 5 minutes. slice potato into large cubes and place in bottom of crock pot. remove garlic and pepper from skillet and set aside. place flour in flat bottom bowl or large plate, mix in salt and pepper, and fully dredge both sides of beef roast. saute both sides of roast in skillet, about 2-3 minutes per side. peel carrots and cut into thirds, and slice mushrooms. remove roast and place atop potatoes in crock pot. place carrots and mushrooms around sides of roast.

return garlic and pepper back to skillet, adding tomato sauce and ground cumin. slowly stir in beef broth and bring to a slow boil. boil for 5 minutes, then pour over roast in crock pot - add slowly to keep pepper and garlic atop beef roast. cook on high for 3 hours.

Sunday, March 27, 2011

sweet corn bread pudding with raisins, cinnamon, and maple syrup


a week ago it was sunny and 70F!  just so you know.

"spring is in the air" as they say, but not really.  for us eagerly awaiting as Spring settles in, today is a partly sunny and mid-40s shunning of the spring season.  if you do not know what this is like, just come on down to Missouri, she delivers every year.

i had a great morning run, even in the freezing temps, thanks in part to the fuel this sweet corn bread pudding had given to me.  it is a special treat, even reheated a week later.

my spring (late-winter weather) break was intended to have more sun than i could stand, not possible, and tanning-quality 70 degree temps.. all spent on the lake!  substitutes will have to be made for some of those plans, but trust me, you won't be needing any sub's while making this corn bread pudding.

get after it!


the friendlier printer version

sweet corn bread pudding with raisins, cinnamon, and maple syrup
full credit goes to Jane's Sweets & Baking Journal
serves six

make the corn bread first, let it cool, then bake again making the bread pudding.
i chose to make corn bread, refrigerate, and then make the bread pudding as i had the time.

corn bread:
30 minutes

3/4 c. yellow corn meal
1 1/4 c. all purpose flour, unbleached
1/4 c. sugar, granulated
1/2 tsp salt
2 farm eggs, lightly beaten
1 c. whole milk
1/4 c. vegetable oil

start by preheating oven to 400F.  mix dry ingredients into a medium size bowl.  whisk together liquids in small size bowl.  pour liquids onto dry ingredients and stir just to combine.  add mixture to lightly greased or buttered 8"x8" or 9"x9" baking pan.  bake for 20 minutes, or until top of bread is lightly brown and passes the toothpick test.  cool on stove top or rack in the baking pan.

bread pudding:
serves six, 1 hour 30 minutes

corn bread cubes, cut from above recipe
2 c. whole milk
1 c. heavy whipping cream
4 farm eggs, lightly beaten
1/2 c. maple syrup
1/2 c. sugar
1 tbsp ground cinnamon
1/4 tsp salt
1/2 to 2/3 c. raisins, depending on your liking for raisins

start by preheating oven to 325F.  remove cornbread from baking pan.  scrap crumbs from bottom of pan, then cube bread back into the baking pan.  bread cubes should be about 1 inch square and tightly packed with all cubes touching or close to bottom of the pan.  baked for 15 minutes until dry and nicely toasted, doesn't need to color.  remove from oven and cool on stove top or rack in the baking pan.

increase oven temperature to 350F.

in a large mixing bowl, thoroughly whisk together milk, heavy cream, eggs, and maple syrup.  in a small mixing bowl mix together sugar, cinnamon, and salt.  add dry sugar mixture to wet milk mixture and thoroughly whisk. 

once corn bread cubes have had time to cool, spread raisins evenly across top and press into creases between cubes.  whisk liquid mixture once more and pour slowly over corn bread cubes.  make sure all cubes are covered and able to adsorb liquid.  lightly press cubes still dry to bottom of pan.  allow pudding and liquid mixture to sit for 15 minutes for the liquid to adsorb.

bake pudding for 60 minutes, checking at half way mark to see if tops are browning too quickly.  if they are, cover with aluminum foil and continue baking.  bake until tops and sides are toasty and golden.  remove from oven and cool on stove top or rack, middle of pudding should be wet, but not "jiggly".  serve while warm with small drizzle of syrup if you like.  store leftovers in refrigerator up to one week.